Estimated difficulty: 💜💜 🤍 🤍🤍
So you have decided to host a website on your EC2 instance? Samesies! If you still aren’t sure where to start with hosting, then check out my previous post. When it comes to creating a website, there is a shopping list of things that you will need to set up, to get yourself started.
- Hosting (your EC2 instance)
- A webserver to be installed on your EC2 instance.
- A domain name
- Content
Now we have already sorted out that hosting, let’s sort out the rest! This post is going to run through how to spin up a basic website and how to (very basically) check for any potential vulnerabilities. I say this will only provide basic security checks, as for a rule of thumb – the less functionality of the website, the less that can become vulnerable… But don’t quote me on that, as I also like to live by the rule of – nothing is secure.
Installing Your Web Server
Now let’s get stuck in! We know from the previous post, how to log in to our newly spun up EC2 instance. As a quick recap, we will be using the below command:
ssh -i /path/my-key-pair.pem my-instance-user-name@my-instance-public-dns-name
Once you have managed to SSH into your server, you should now be able to install the webserver that you want. When it comes to picking what webserver to use, there are many different ones to pick from. I personally am going to make use of Nginx. I am going to use this one because of its popularity and how lightweight it is. However, this is not the only web server in existence, so here is a table of popular webservers you may want to go for, and reasons to use them.
| Web Server | Description |
| Nginx | This is an open-source web server that is very widely used. It is very lightweight and easy to use. It supports HTML, JavaScript CSS etc., therefore it is useful when creating a basic website. Furthermore, Nginx is diverse and can be used for things such as a reverse proxy, load balancer and mail proxy. |
| Apache2 | Free and open-source web server. Supports PHP and MySQL etc. This is also a very popular web server, which can be used for more intensive web applications. Apache can come with multiple packages that are utilised in web development. |
| IIS | Standing for Internet Information Services, this is a web server that Microsoft designed. Older versions of this web server contain vulnerabilities, so it is important to keep it up to date. IIS web servers typically go hand in hand with the .NET framework. .NET is a web framework for C# developers, where it allows the developers to create web applications in C# and similar languages. |
Please note that like most other types of software, outdated versions may contain bugs, vulnerabilities or other security flaws. With anything, we always want to make sure we are installing the most up-to-date working version of the product.
With that in mind, let’s get to installing!
- Update your base server.
sudo apt update && sudo apt upgrade -y
- Install the web server of your choice.
sudo apt install nginx
- Optional: There is a sites-enabled configuration file. This file points a client visiting your site, to the local web server runnin on your server (nginx in this case). To get to the default config file, go to the following path. From here you can create your own.
cd /etc/nginx/sites-enabled/default
- All default root web files for Nginx will be stored in the below filepath.
/var/www/html/
- Add your own index.html and modify to contain any content that you want.
/var/www/html/index.html
The following section details what sort of content you might want to add to this index.html file.
Adding Content
Create a page! This is the fun part where you get to design and build your very own web page. I, like the noob I am, created a very basic HTML web page. I do intend to learn more JavaScript and incorporate CSS, however, at present, I just wanted to display a static page for the purpose of this blog post.
Add the below to an index.html file in the web root directory /var/www/html/.
cd /var/www/html/

touch index.html

nano index.html
<!DOCTYPE html>
<html>
<body>
<p>
Hello World. This is not the greatest website in the world...
</p>
<p>
This is just a tribute.
</p>
</body>
</html>
There are plenty of other tags that can be used within HTML5. W3Schools documents these and provides examples for them.
Picking Your Domain
Just like the webserver technologies that you can choose to install on your main server; there are also many domain name providers you can go to, to buy a domain. To name a few off the top of my head:
An example of a domain would be google.com. But what actually is a domain you might ask? A domain is a unique name that identifies a specific website. It is used as a human-readable way to identify a server. The domain correlates to the servers public IP address. An IP address is a way to identify a host. For example, if you wanted to visit https://cloudflare.com, you could also visit the IP address https://1.1.1.1, as this is the IP mapped to that domain name. This following video may be basic, but it may help you understand further.
When a user visits your Universal Resource Locator (URL), an address that also contains your domain, there is a process that the user’s connection goes through to be able to retrieve the resource. This is a Domain Name System (DNS) lookup.

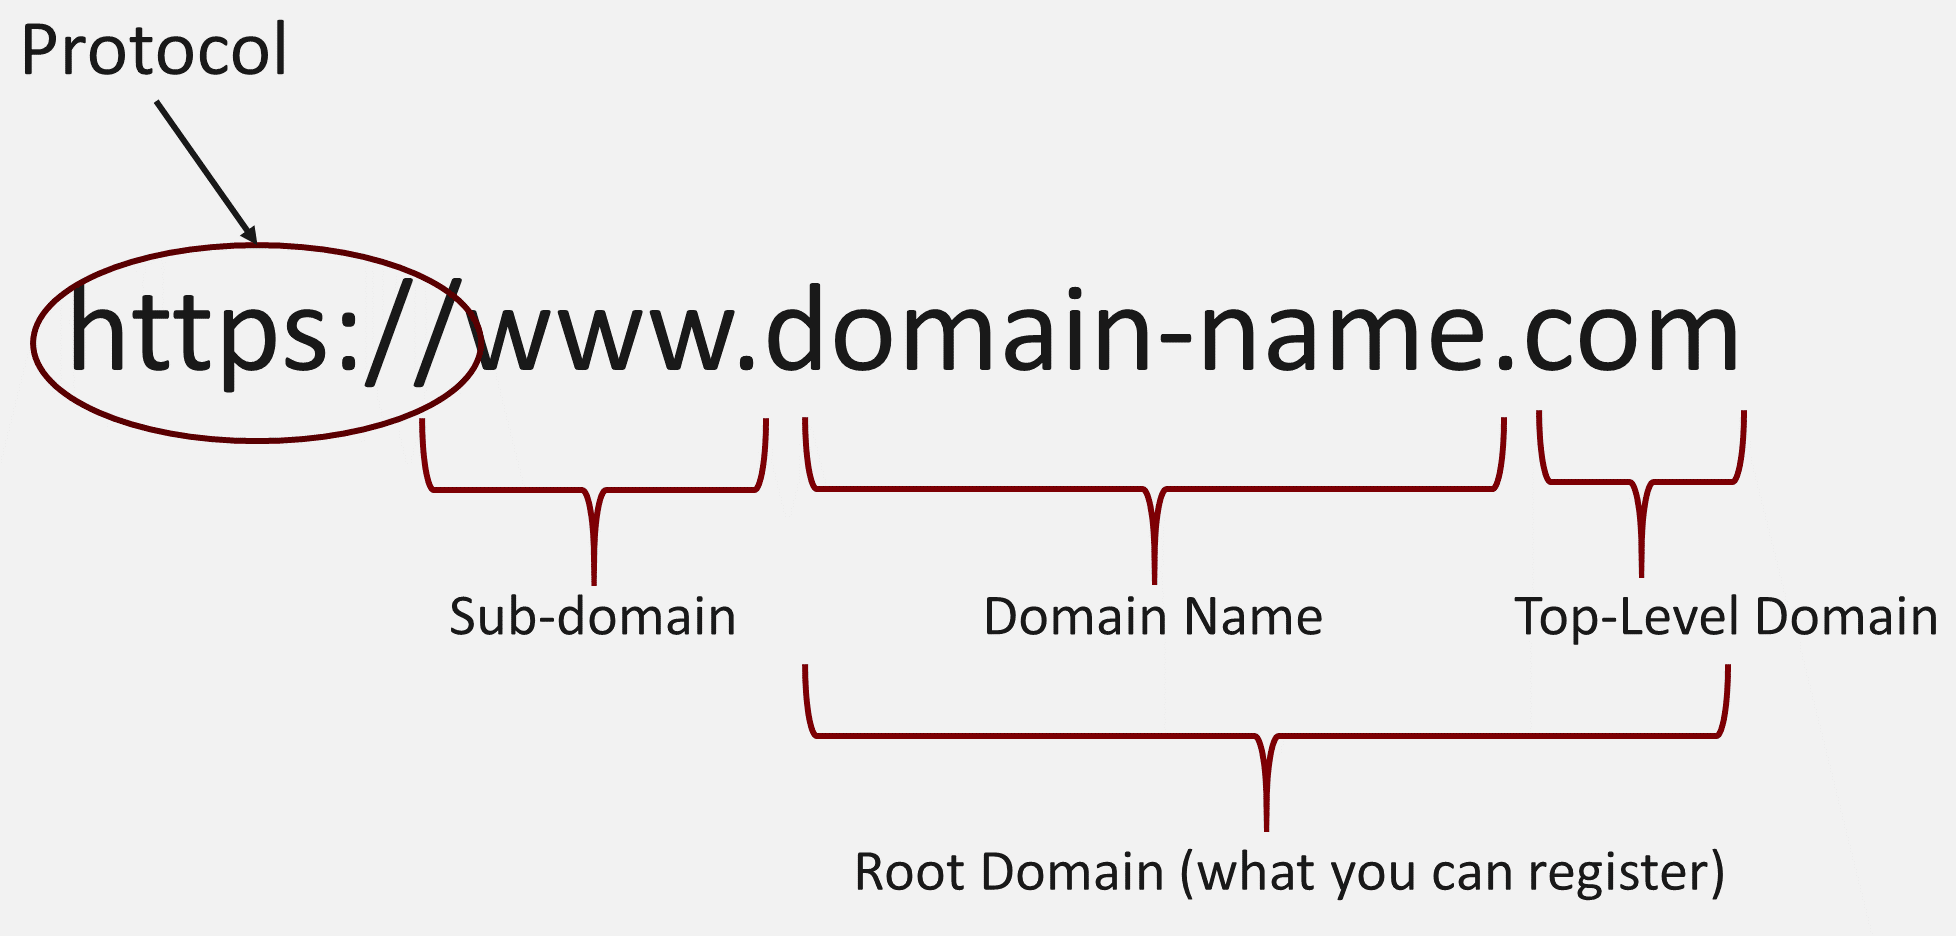
A further example of a domain in use within a URL would be as follows:
https://thisisnotthegreatestwebsiteinthe.world
This is quite fitting for the code I have written to be displayed on my site. The breakdown of a URL can be seen in the following diagram:
Now you have a better understanding of what a domain is, let your imagination run wild and go to funky town with the domain name you wish to pick.
Creating Your Site
We now have some of the main components sorted. Let’s check them off the list shall we:
- EC2 instance.
- Installed web server.
- Some code within an index.html file as your first web page.
- A domain name, to make it easier for people to remember where to go to visit your website.
Now each item has been checked off, we can combine the components to create our very own website. Currently, with the webserver running on your EC2 instance and a web page already created, we should be able to go to your public IP address and view the content of that webpage. Follow the below demo to try this.
- Go to your instance and copy your public IPv4 address.

- Paste your public IPv4 addess into a new browser tab and append http://.

Now we need to link the IP to a domain name. You need to follow the below steps.
- Allocate Elastic IP to running instance (so it does not change).
- Associate elastic IP to the running instance. You need to follow the below video tutorial, however, ensure to pick the running instance, the private IPv4 address and keep the “reallocate IP address box unticked“. I was not able to fully demo this, as I did not want to disassociate the current elastic IP I have configured with my running instance.
- Create a public hosted zone within AWS.

- Once you have your new public hosted zone within AWS, you want to create a new record within your hosted zone. The config should look something like the below:

- The name servers identified in NS record of your AWS hosted zone, now need to link to your domain provider. I have used namecheap to buy my domain, and therefore have configured the custom DNS within namecheap to point to the Amazon name servers in the record.

Once everything has been linked, you should now be able to go to your domain name and actually get the webpage hosted on your web server back!
Securing Your Site
For the final little tweaks, we are going to make sure that our website is making use of HTTPS and is not just a basic HTTP site. There are many reasons why we want to use HTTPS over HTTP.
- Implementing HTTPS does not provide much of an impact on the performance of your website.
- It will encrypt the communications between the client accessing the website and your server. Any sensitive data that is passed over the wire should not be easily read by any potential intercepting parties.
- It makes your users feel more secure. These days it is rare (or should be rare) to see websites making use of HTTP. There has been plenty of bad press telling people not to trust websites that do not display the secure padlock or make use of HTTPS.
LetsEncrypt, is used within a tool called Cerbot, to secure websites for free. The following image outlines this process.

We are going to use certbot to encrypt the communications of our website. This is a command-line executable that is used to manage certificates.
- Install certbot on your Ubuntu EC2 server.
sudo apt install certbot

sudo apt-get install python3-certbot-nginx
- Run certbot specifically for your instance. See example below:
sudo certbot --nginx -d thisisnotthegreatestwebsiteinthe.world
- Make sure to configure your site with the following options. You can tweak these to suit you.

- Configure the AWS instance rules to only allow traffic over port 443, unless 80 is otherwise needed (e.g. for when you renew your certs with certbot). Remember to remove the port 80 rule, when not needed.
Testing You Web Server
Everything is pretty much there. You have a working website that you can now develop upon until your heart’s content. However, what would a security blog be, without a little security? We can run a select few tools to give the webserver config the once over and ensure that it is not immediately vulnerable to anything.
TestSSL
We can run TestSSL, to test the TLS SSL configuration of our server. We can do this by running the below command.
sudo apt install testssl.sh

testssl --html <your domain>
Nikto
Nikto, although it is not necessarily the most up to date, is a web server security scanning tool. It can identify vulnerabilities in a configured web server. Follow the commands to try it yourself.
sudo apt install nikto

nikto -host <your domain>:443
NMap
NMap is a great tool for mapping out the network and identifying open and available ports. You can use NMap to see if there are any unnecessary ports open on the server that the application is hosted on. You can easily tweak an NMap scan to be more specific, this example is an example of scanning everything over TLS. You can also perform a UDP scan.
sudo apt install nmap

nmap -p- <your domain>
Other tools also exist when it comes to web application testing, including vulnerability scanners such as Nessus, however, this will get you started.
I hope you enjoyed this slightly different mini-series. Please let me know your thoughts on this and even if you have just enjoyed it! I know I had a lot of fun making this.
Sarah <3
i think you left INSERT COMMAND HERE, in your first text box.
`ssh -i /path/my-key-pair.pem my-instance-user-name@my-instance-public-dns-nameINSERT COMMAND HERE`
is there a way to get the web server to auto install updates? i dont want it to have vulnerabilities if i forget to manually update it?
Hi! Thank you for pointing out the leftover comment. That is much appreciated 🙂
When it comes to updating the server, I personally manually run the commands stated. However, you can always set up the Linux equivalent of a scheduled task. These are called Cron jobs, do you think that might work for you?
Thanks!
Thanks for your article. Is I have .net framework error in iis server, can you tell me to fix how?
This may not be the best place for this question. It might be worth posting your question with a picture of the error or any additional logs to the Microsoft Community forums! Sorry I can’t help more.