Estimated difficulty: 💜💜 🤍 🤍🤍
In this post, we are slightly diverging from the original MOBster series and taking a look at Amazon Web Services (AWS). This is the first of two posts that will walk you through hosting and building a simple website… Yes, the web dev bug has bitten me, all because I wanted to buy another domain.
DISCLAIMER: Firstly, Amazon have extremely comprehensive docs, and I also do recommend reading these as well if you are interested in learning more about AWS and the cloud in general. Secondly, I apologise for the volume of memes you are about to see.
What is an EC2 Instance?
Before going into detail about creating the infrastructure of your website, we should first talk about what the EC2 service actually is! Well, first things first, EC2 stands for Amazon Elastic Compute Cloud (EC2). This is a server hosted in Amazon’s cloud. It is a flexible service that can stretch to meet the demands of the site you are wanting to host.

As you will see when spinning up the Amazon EC2 service, there are many other compute services available. Each has slightly different, yet versatile functionalities. Below is a summarized table of a few notable services, however, there are more instances you can explore (I have only explored EC2 so far)! Each service has a slightly different purpose.
| Instance | Features |
|---|---|
| EC2 | * Scaleable compute capacity. * Pay only for the capacity that is used. * Multiple different types such as – On-demand, Reserved and Spot instances. |
| Lightsail | * Includes a virtual machine (VM), SSD storage, etc. * Easy to use for quick deployments and small projects. * Spin up and destroy dev environments easily. |
| Lambda | * Runs code without the need for provisioning and running servers. * It is possible to set up code to automatically trigger from other AWS services or mobile apps. * No management of resources needed. |
| Fargate | * Runs containers without having to manage servers. * Moves the focus on designing and building applications. * Package application in containers and specify the server requirements. |
| Elastic Beanstalk | * Used for scaling developed web apps using: Java, .NET, Node, Python, etc. * Allows you to upload code without the server management. * Access to underlying server resources can be granted at any time. |
| Batch | * Scales to what is required. * Many (and I mean many) computing jobs can be run without having to manage provisioning when processing batch jobs. * Makes use of EC2 and Spot. |
Overall, my personal reasoning behind using the EC2 service, over something like Lightsail, is that it is free to use (given I don’t go over my compute power allowance) and I will (at some point in time) create a more complex and professional looking website. I am using it as a tool for learning AWS, without massively breaking the bank. And AWS outgoings can creep up on you if you don’t watch some of your instances like a hawk.

Creating Your EC2 Instance
Now we know what in the heck in bob an EC2 instance actually is, and that this is the service we actually want and need… Let’s launch it!
Launching Your Instance
A pre-requisite to this is that you need to have registered for a free AWS account. As soon as this is complete you can sign in as the root user and be directed to the AWS Management Console. In summary, to pick the service follow these below steps, however, I have also created a video to help map out this process.
AWS Console > Services > EC2 > Instances > Launch Instance Button.
Configuring your Instance
As soon as you have clicked on “Launch Instance”, then you are well on your way to picking the specs for your server. We want to know what operating system (OS) /machine image to use, the type of instance, storage details and the list can go on.
Choose your Machine Image
There are many different machine images that you can choose from. I chose the Ubuntu 20.04 image for this instance as I have used it before and can comfortably work in an environment that uses Ubuntu as its OS. Alternatively, Debian would work well as it is also lightweight and easy to use. Furthermore, I find *Nix builds easier to maintain and update.
When picking the CPU architecture, I decided to go for x86, as it is meant to be faster at processing than ARM architectures. This may eventually come back to bite me, as it is possible to be charged if your instance uses more than its allocated specs. All in all, I would say if this is a long term project, think a little more carefully about how well you might want your site to perform and what CPU architecture you would like to use.
Choose your Instance Type
The instance type is the server that you would like to use. E.g. what CPU, memory, storage and network capacity you would like to have. Picking this should be dependant on what you want the server for. When I pick the instance type, I go for the t2.micro server instance. This is mainly because it is the free tier, however, I also do not require much computing power nor do I need the network performance to be great, as I am only hosting a personal little website, where not many people will visit.
Configure Instance Details
At this point, you can leave all the instance details like the default settings. For the most part, I would do this anyway, as my project is very small and there does not seem to be anything I would change. However, there are a few little tweaks that I do like to make when configuring this instance. I will go into detail about this further on in this section.
Configure Instance Storage
The default for your storage settings should be encrypted storage. This adds another layer of protection to your instance, as any data being stored or in transit will not be easily eavesdropped on or discovered by any unauthorised actors. In this case, I would say, it is better to be safe than sorry!
Add Tags
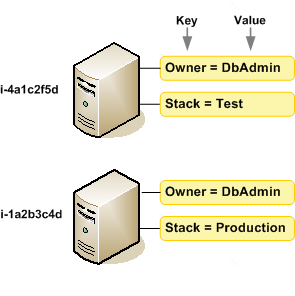
Based on the documentation, a tag is a way to categorise an instance/resource by purpose, owner or environment. I do not use tags for my instance as I normally am spinning up one and managing the one. A good example of tags being used for the instances can be seen in the diagram below.
Configure your Security Groups
Hoorah, we have actually made it to some security points in this blog! Security Groups, what are they might you ask? Well, these are a set of firewall rules, which enable you to define the access to your instance. For example, we might want SSH to be our method of authentication (not a bad choice if you only use SSH keys).
Disclaimer 2.0: The below video, walking through to configure your EC2 instance, is not a real-world example of how to configure access to your instance (for example 127.0.0.1 is the localhost address of the EC2 instance). The rule in place for this example is:
SSH protocol: TCP port: 22 src: 127.0.0.1/32 name: SSH for Home!
Ideally, you would want to restrict the access to your own IP, given that you use a static IP address, as a dynamic external IP is subject to change and could block your access. However, it is possible to configure an any rule to your instance:
SSH protocol: TCP port: 22 src: 0.0.0.0/0 name: SSH for EVERYONE!
Securing your SSH when it is supposedly allowing access to anyone, can be done through the use of SSH keys and implementing account lockout/intrusion prevention mechanisms, such as configuring a software like fail2ban. Therefore, if anyone tries to brute force access, they are likely to be detected and blocked. We will go more into this in the subsequent sections.
Other rules within your security groups, could be enabling port 443 if you are designing and hosting a website.
LAUNCH IT!
All you gotta do is click the Launch button, baby!
Configure SSH Keys
Once we have launched the instance, we are prompted to create a new key pair. This is so we can configure our SSH access to the host. We have 3 options:
- Choose an existing key pair
- Create a new key pair
- Proceed without a key pair
We can generate a new key pair and configure our ssh client to grant us access. Follow the below steps, to create a new key pair and SSH into your instance.
- Enter in your “Key pair name”. This can be whatever you want.
- Click “Download Key Pair”. This will download a new .pem file on your host machine. The .pem file can only be used to access the instance over SSH. It will not work if you try to configure it with PuTTY (trust me I have fell for this before). For that you need a .ppk file.
- Store / move your .pem file into a secure location on your host.
- Make sure the permissions of your file are set correctly using chmod if you are using a Linux host to connect. Find out more here.
- Make sure you have OpenSSH installed on your host, else you won’t be able to SSH!
- Lastly, go into your command line and run the following command:
ssh -i /path/my-key-pair.pem my-instance-user-name@my-instance-public-dns-name
The -i stands for Identity file (i.e. your private key) and then you can login with the user and public DNS name. If you have chosen an Ubuntu instance, like me, then the instance user you will use is “ubuntu“. To find your public DNS name you need to go to your Instance Summary and select Public IPv4 DNS:
- EC2 > Instances > InstanceID

Securing Your EC2 Instance
We have already briefly mentioned some security features when creating the EC2 instance. These being:
- Encrytped Storage
- Security Groups
- Configuring SSH keys
Other security elements we have not really talked about are:
- Access management through Identity Access Management (IAM)
- Patching / Upgrading
- apt update
- apt upgrade
Now let’s have a look at some of these more in-depth.
Secure Shell (SSH)
We have already touched on SSH. This is a way to remotely access your instance through an encrypted tunnel. Although we have talked about using keys to SSH into the instance, that is not always the case with SSH, as it can be possible to only make use of a password or other authentication types.
Keys are more secure than passwords as they are longer in length and harder to brute force. To check that your SSH instance is only making use of keys to authenticate you can add an additional “-v” flag to make the output of your connection verbose. I look for the below debug message to check what authentication methods are allowed via SSH:
debug1: Authentications that can continue: publickey
Although keys are more secure methods of authentication, this does not detract away from the point that your instance may be publicly accessible. For example, you would have made use of the public DNS name to SSH into your instance in the first place. In this case, it might be handy to set up intrusion prevention software as we mentioned earlier. I will walk through how to set up Fail2Ban a monitoring and prevention software below.

Fail2Ban
Fail2Ban monitors system logs to check for any automated/brute force attacks. To install it on your instance you need to follow these steps. Please note that these steps are for Ubuntu machines, so the commands may be different if you are using a different machine image.
- Update your instance. You can run this command in the
sudo apt update && sudo apt upgrade -y
- Install Fail2Ban
sudo apt install fail2ban -y
- The Fail2Ban service should automatically start, however, you can check this by running the following command.
service fail2ban status
If it does not start then you can run this command:
service fail2ban start
- Now we need to configure Fail2Ban. To check out what the default configuration is, you can go to the config file at /etc/fail2ban/fail2ban.conf and read its content. To make changes you can create a new file /etc/fail2ban/fail2ban.local, which will override the fail2ban.conf file.
cat /etc/fail2ban/fail2ban.conf
- You can change the following config files in the newly created fail2ban.local, if you wanted.
- loglevel – The level of logging, e.g. error, warn, info or debug.
- logtarget – The types of action being logged into a file, e.g. logging any errors or mesages.
- socket – Location of the socket file.
- pidfile – Location of the Process ID (PID) file.
- A jail.conf file is also installed with fail2ban at /etc/fail2ban/jail.conf. This file specifies the bantime and number of attempts a host will get before being banned etc. To update or change the settings, similarly to fail2ban.conf you should change the file in a jail.local file.
cat /etc/fail2ban/jail.conf | less
The fail2ban service should work as is, straight out the box, but you can override the default values to change how strict you want to be with access and this may also depend on what you want to store. There are plenty of good docs on configuring this on the interwebs.
Identity Access Management (IAM)
IAM is a way of implementing users and groups and applying certain permissions for these. I sometimes like to think of it as Active Directory (AD) for the Cloud, where you might have a domain user and that user then has certain permissions for what they can and can’t do on their host and the network. The use of IAM may be useful if you want to collaborate on a project or have multiple people working together on the same thing.
Amazon has created a good introduction video on what AWS IAM actually is.
Even though I am not making use of IAM users, since I am the only person working on my project, I thought I would play around with making an Administrative user. (Ideally, I should probably be using an IAM user anyway, since it is not security best practice to login to the AWS Management Console as a root user…). I have outline how to create a user below. When it comes to creating your own IAM user, I would double-check the specific permissions you need depending on what you are doing… Because I am about to give myself all the perms.
Once you have created the IAM user, you can create SSH keys and configure the user in the Users summary.
- IAM > Users > username
Patch Management
What is patching? Patching is a way of saying, “applying updates to your server/infrastructure”. You patch your servers to make sure they have the most up-to-date security and bug fixes. This is to make it harder for any potential attackers to exploit your system, as it is less likely that an existing exploit will be applicable (match the software version) of your server.
It is common to hear patches being speedily deployed if a zero-day exploit has been found for a specific piece of software.
To manage your server, make sure you keep the server up to date, by running the following command we saw earlier when setting up Fail2Ban.
sudo apt update && sudo apt upgrade -y
Useful Tools
Tools that can be used to test the security of your AWS instances include:
- ScoutSuite – Security auditing tool.
- CloudMapper – Map cloud infrastructure
- Prowler – Checks against CIS Benchmarks and hardening guides
And that is all from me (you made it!!!), I hope you have a happy Fri-Yay and that you have enjoyed the change-up in blog post content! Please let me know what you think in the comments. 😀
Sarah <3
